
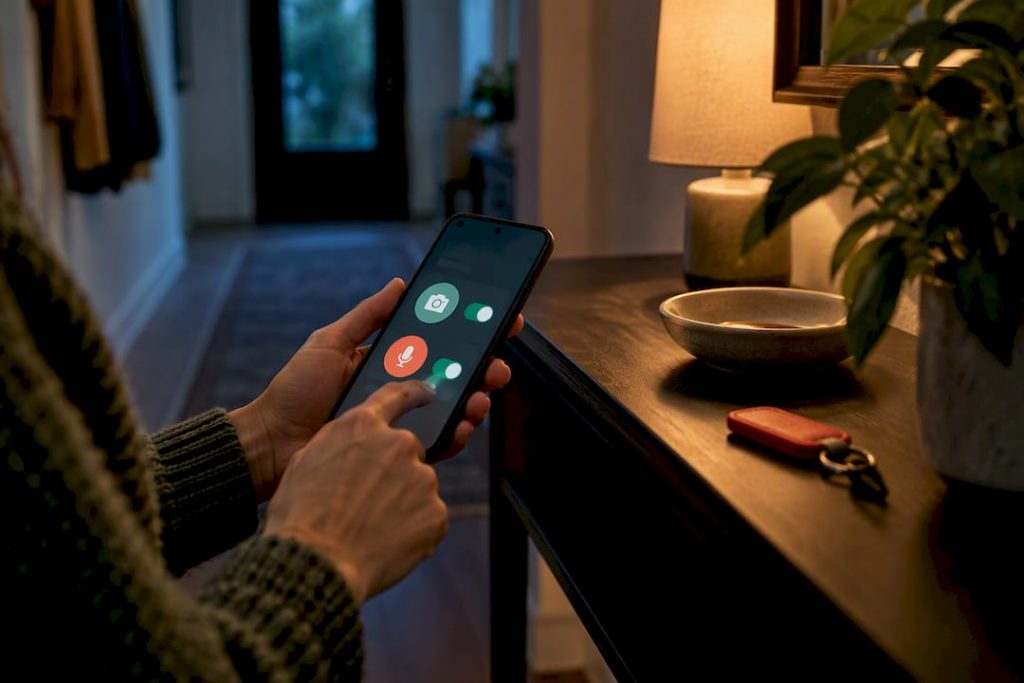
Use Lizard’s Lunch’s five step, 5 minute audit to lock Android privacy settings for Canadians. Revoke unused permissions, set location precision, and…
Start with the privacy dashboard, then move to the permission manager, location controls, camera and microphone toggles, and Google Play Protect. Open Settings, tap Privacy (sometimes labeled Security & privacy), then tap Privacy dashboard. That single tap begins a full audit you can finish in 5 to 10 minutes, and it’s the fastest way to see exactly what your apps have been doing behind the scenes.
TL;DR:
- Most apps requesting camera, microphone, or location access should be set to ask every time or only while using the app, not allowed all the time.
- Managing location permissions per app and toggling device-wide location accuracy can significantly reduce unwanted precise tracking.
- Regularly reviewing and removing risky or unused apps from Google Play Protect and auto-reset permissions helps prevent malware and overreach.
- Turning system-wide camera and microphone access off during sensitive activities and hiding lock screen notifications enhances privacy.
- Conducting a monthly privacy audit by revoking unnecessary app permissions, checking permissions settings, and clearing location history minimizes data exposure.
Table of Contents
- 1. Use the Privacy Dashboard to See What Apps Are Doing
- 2. Set App Permissions by Type or One App at a Time
- 3. Choose Precise or Approximate Location for Every App
- 4. Control Camera and Microphone Access With Indicators and Toggles
- 5. Let Google Play Protect Catch Risky Apps Automatically
- 6. Turn On Theft Protection and Advanced Protection Features
- 7. Limit Ad Tracking Through Ads Privacy Settings
- 8. Run a 5-Minute Privacy Audit Right Now
- 9. Common Mistakes We See and Habits Worth Building
- 10. Keep Background Apps From Quietly Draining Your Privacy
- 11. Set Up and Manage a VPN on Your Android Phone
- 12. Clear Out Stored Location History and Activity Data
- 13. Browse More Securely and Clear Your Data Regularly
- 14. Understand What Data Third-Party Apps Actually Collect
- Balancing convenience with privacy controls
- Give Your Content the Same Attention You Give Your Privacy Settings
- Sources
- FAQ
1. Use the Privacy Dashboard to See What Apps Are Doing
The privacy dashboard shows which apps accessed your camera, microphone, and location in the last 24 hours, along with a timeline of that activity. It’s the clearest window into real behavior instead of guesswork.
Here’s how to put it to work:
- Open Settings, tap Privacy (or Security & privacy on some devices), then tap Privacy dashboard.
- Tap camera, microphone, or location to see which apps used that permission and when.
- Tap any app in the list to review or revoke its access directly from that screen.
If a flashlight app or a simple offline game shows up requesting your location or camera in the background, that’s worth revoking immediately. Revoke access when it has nothing to do with what the app actually does, and leave it alone when the feature depends on it, like a map app needing location to route you.
2. Set App Permissions by Type or One App at a Time
Android gives you two ways to manage permissions, and knowing the difference saves you time. The permission manager lets you adjust a permission type across every app at once, while the per-app route lets you fine-tune a single app’s access.
- Open Settings, tap Privacy, then tap Permission manager to see every app that uses camera, microphone, location, contacts, and more, sorted by permission type.
- Tap a permission type, like Camera, to see every app that has it and adjust access for each one from that single screen.
- To edit one app instead, go to Settings, tap Apps, tap See all apps, choose the app, then tap Permissions.
- Each permission typically offers four choices: Allow all the time, Allow only while using the app, Ask every time, or Don’t allow.
For anything involving camera, microphone, or location, “While using the app” or “Ask every time” is the better default. It keeps the feature working when you need it without leaving a standing invitation for background access.
3. Choose Precise or Approximate Location for Every App
Location permission actually works on two layers, and mixing them up is one of the most common mistakes we see. The first layer is per-app: whether an app gets your precise location or just your approximate one. The second is a device-wide setting called Location Accuracy, which uses Wi-Fi and Bluetooth scanning to sharpen GPS results.
- A weather app only needs your approximate location to give you a forecast, so switch it to approximate under its permission settings.
- A navigation or ride-share app needs precise location to actually route you, so leave that one on precise.
- To set this per app, go to Settings, tap Apps, choose the app, tap Permissions, tap Location, then choose precise or approximate, or set it to Ask every time.
- To adjust the device-wide setting, go to Settings, tap Location, then toggle Location Accuracy off if you’d rather limit Wi-Fi and Bluetooth scanning.
Google’s location data policy confirms these are separate controls, and some of these exact menu names only appear on Android 12 and later, so older devices may show a slightly different layout.
4. Control Camera and Microphone Access With Indicators and Toggles
A small green dot in the top corner of your screen means an app is actively using your camera or microphone right now. If you see it and don’t recognize the reason, that’s your cue to check which app triggered it.
To revoke access, open Settings, tap Apps, choose the app, tap Permissions, then set Camera or Microphone to Don’t allow. If you’d rather cut access everywhere at once, Settings, tap Privacy, then toggle Camera access or Microphone access off system-wide. Just know that video call apps, QR scanners, and voice assistants will stop working properly until you turn it back on.
Pro Tip: Hide notification content on your lock screen (Settings > Notifications > Lock screen) so message previews and app alerts stay private even when your phone is sitting face-up on a table.
5. Let Google Play Protect Catch Risky Apps Automatically
Google Play Protect scans apps before and after you install them, flags anything behaving like malware, and can automatically reset permissions for apps you haven’t opened in a while. You’ll find its settings inside the Google Play Store app, not in your phone’s main Settings menu.
- Open the Play Store, tap your profile icon, then tap Play Protect to see recent scan results.
- Tap Settings inside Play Protect to confirm Scan apps and Improve harmful app detection are both turned on.
- If Play Protect flags an app, open it, review the exact permissions it’s using, and uninstall it if the warning explains a real risk.
- To stop a specific app’s permissions from auto-resetting after inactivity, open the app’s permission settings and disable the auto-reset toggle for that app.
Keep both core Play Protect toggles on. They cost nothing in convenience and catch problems most people would never spot on their own.
6. Turn On Theft Protection and Advanced Protection Features
For higher-risk situations, like frequent travel or carrying sensitive work data, Android’s theft protection tools add another layer. You’ll find them under Settings, then Google, then All services, then Personal & device safety, or in some cases under Security & privacy, then Advanced Protection.
Theft Detection Lock uses motion sensors to lock your screen if the phone is snatched and in motion. Offline Device Lock secures your phone if it’s disconnected from the internet for an unusual stretch. Failed Authentication Lock triggers after repeated wrong unlock attempts, and Remote Lock lets you secure a lost phone from another device. Availability varies by Android version and manufacturer, so check your specific model if a feature seems missing.
7. Limit Ad Tracking Through Ads Privacy Settings
Android assigns you ad topics based on your app activity, and those topics feed the personalized ads you see across different apps. You can review and remove them, along with blocking ads that are suggested based on other apps you’ve used.
- Go to Settings, tap Google, tap All services, tap Privacy & security, then tap Ads to open the Ads privacy screen.
- Tap Ad topics to see what’s been assigned to you and remove any topic you don’t want influencing your ads.
- Toggle off app-suggested ads if you don’t want other apps recommended to you based on what you already use.
- Ad topics expire automatically after four weeks, but removing them manually stops them from shaping ads sooner.
Turning these off doesn’t stop ads entirely, it just makes them less tailored to your specific behavior.
8. Run a 5-Minute Privacy Audit Right Now
This is the checklist version of everything above, ordered so you can move through it without backtracking.
- Open the privacy dashboard and revoke any camera, microphone, or location access that has no clear reason to exist.
- Open the permission manager and set sensitive permissions, especially camera, microphone, and location, to Ask every time wherever that option is available.
- Decide whether to turn off Location Accuracy for less precise tracking, and switch any app using background location to While using the app or Ask every time.
- Check Play Protect for flagged apps, uninstall anything genuinely risky, and opt individual apps out of unused-app resets if you use them rarely but still need saved permissions.
- Toggle Camera access and Microphone access off system-wide during sensitive activities, like meetings or private conversations, then turn them back on when you’re done.
Pro Tip: Run this same five-step sequence once a month. Permissions creep back in as you install new apps, and a short recurring check catches problems before they pile up.
9. Common Mistakes We See and Habits Worth Building
We often notice people confusing Location Accuracy with per-app precise or approximate settings. They’re not the same thing, and fixing one doesn’t fix the other. A monthly audit, removing apps you no longer open, and defaulting to “while using the app” instead of “always allow” build habits that hold up over time. Lock sensitive apps individually where your phone allows it, hide lock screen notification content, and revisit your ad topics every so often so they don’t quietly pile up.
10. Keep Background Apps From Quietly Draining Your Privacy
Apps running in the background can keep collecting location data, checking your microphone, or syncing personal information long after you’ve closed them. Android gives you a few direct ways to shut that down.
Open Settings, tap Apps, choose an app, then tap Battery. From there you can restrict background activity entirely, which stops the app from running unless it’s open on screen. This works well for apps you use occasionally but don’t want running unattended, like a shopping app or a game you rarely open.
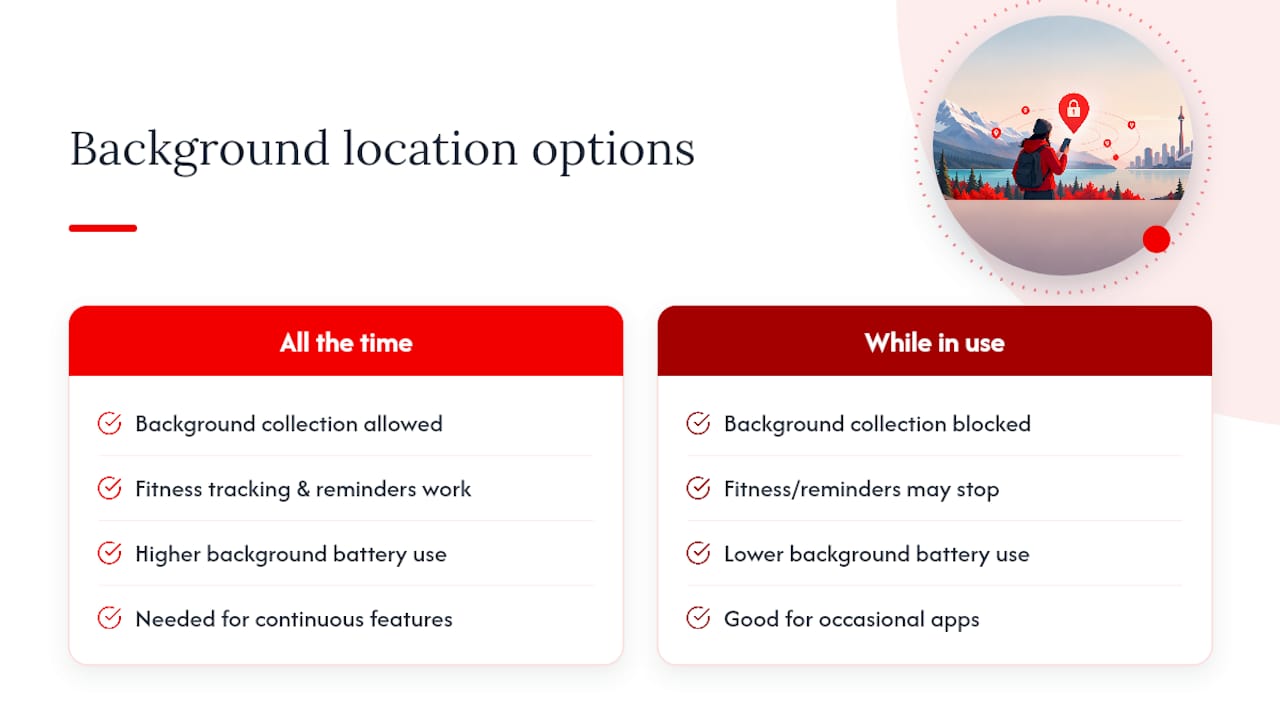
For location specifically, the permission manager lets you separate “while using the app” from “all the time” access, and switching background location to “while using the app” is one of the more effective single changes you can make. Some apps will warn you that certain features, like fitness tracking or location-based reminders, won’t work without background access. That’s a fair tradeoff to weigh case by case rather than a reason to leave everything wide open.
Battery optimization settings can also indirectly limit background activity, since a restricted app gets fewer opportunities to wake up and run. Check Settings, tap Battery, then tap Battery optimization to see which apps are already restricted and which ones still run freely.
11. Set Up and Manage a VPN on Your Android Phone
A VPN encrypts your internet traffic and routes it through a separate server, which is particularly useful on public Wi-Fi at a coffee shop, airport, or hotel where anyone else on the network could otherwise snoop on unencrypted traffic. Android supports VPN connections natively, and most reputable VPN providers offer a dedicated app that handles the setup for you.
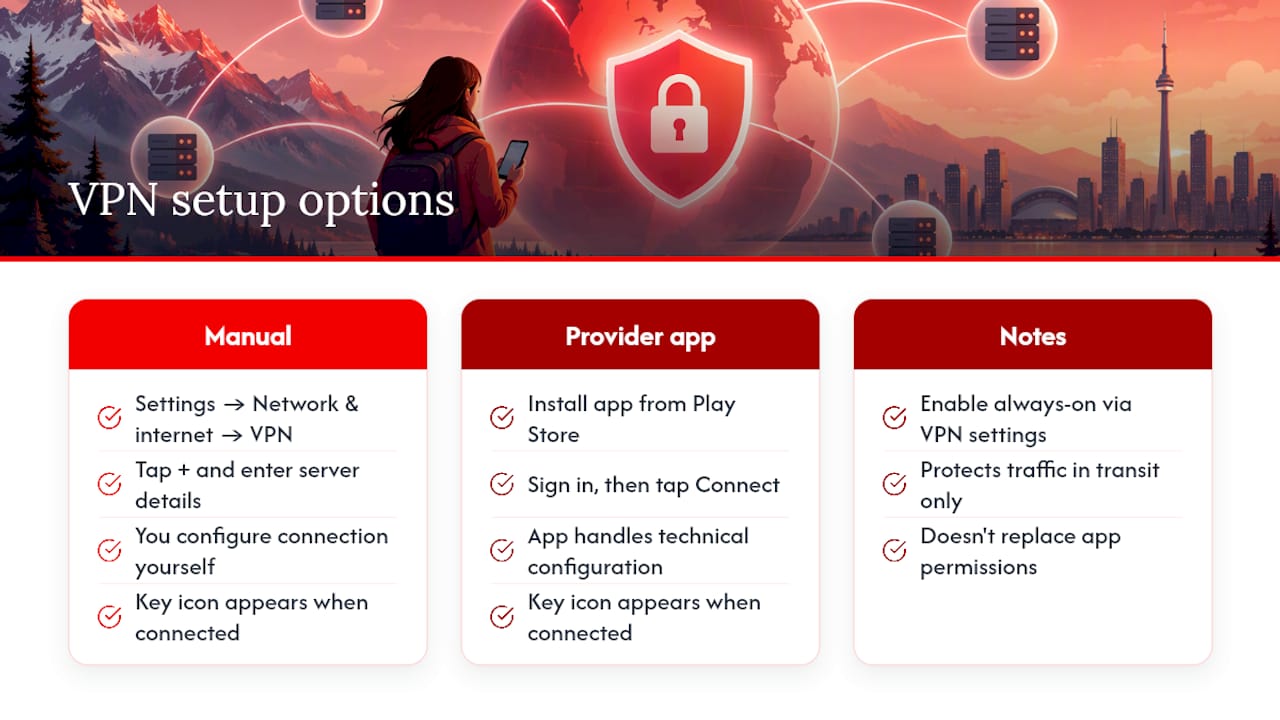
To add one manually, go to Settings, tap Network & internet, tap VPN, then tap the plus icon to enter your provider’s server details. Most people will instead install their VPN provider’s app from the Play Store, sign in, and tap connect, which handles the technical configuration automatically.
Once connected, you’ll see a small key icon in your status bar confirming the VPN is active. You can set it to connect automatically on public networks through Settings, tap Network & internet, tap VPN, then tap the settings icon next to your saved VPN and enable always-on VPN if your provider supports it.
A VPN doesn’t replace the permission and location controls covered earlier. It protects your traffic in transit, not what apps do with data once it’s on your device, so think of it as one more layer rather than a substitute for the rest of this checklist.
12. Clear Out Stored Location History and Activity Data
Even after you tighten permissions going forward, your phone and Google account may still hold months of past location history and activity logs. Clearing that out reduces what’s available if your account or device is ever compromised.
Open Settings, tap Location, then tap Location services to see device-level location history options, including turning off location history entirely. For your broader Google account activity, go to Settings, tap Google, tap Manage your Google Account, tap Data & privacy, then look under History settings for Location History (sometimes labeled Timeline) and Web & App Activity.
From there you can pause future collection, delete specific date ranges, or wipe everything at once. Setting an auto-delete schedule, such as automatically removing activity older than 3 or 18 months, means you don’t have to remember to clear it manually every time.
13. Browse More Securely and Clear Your Data Regularly
Secure browsing on Android starts with your browser’s own settings, not just your phone’s system settings. In Chrome, tap the three-dot menu, tap Settings, then tap Privacy and security to find options like Safe Browsing, which warns you before you land on a known malicious site, and Do Not Track requests sent to websites you visit.
Clearing your browsing data on a regular basis limits what’s stored locally on your device. In Chrome, tap the three-dot menu, tap Settings, tap Privacy and security, then tap Clear browsing data, where you can choose to remove history, cookies, and cached files for a set time range or everything at once.
Using your browser’s private or incognito mode for sensitive searches keeps that session out of your regular history from the start. It’s a smaller habit, but stacked with the permission and location changes above, it meaningfully shrinks your overall digital footprint on the device.
14. Understand What Data Third-Party Apps Actually Collect
Every app you install operates under its own privacy policy, and the permissions you grant are only part of the picture. An app can still collect data you type into it, purchase history, or usage patterns even without touching your camera, microphone, or location.
Checking an app’s data safety section on its Google Play Store listing before installing gives you a preview of what it collects and whether that data gets shared with other companies. This section sits right on the app’s store page, below the description, and it’s worth a quick look before you tap install rather than after.
Limiting third-party data sharing after installation mostly comes back to the same controls covered earlier: tightening permissions, switching location to approximate or “while using the app,” and removing apps you no longer use so they stop collecting anything at all. Fewer installed apps simply means fewer parties with access to your information.
Balancing convenience with privacy controls
Every setting here trades a little convenience for more control, and that’s a fair exchange most of the time. Total lockdown isn’t realistic for daily life, but a short monthly audit, the same 5 to 10 minute pass described above, keeps your phone reasonably private without turning it into a chore.
— Alexander
Give Your Content the Same Attention You Give Your Privacy Settings
Just as you now know exactly where to look to protect your data on Android, knowing where to place your business’s message matters just as much. We work with brands and site owners looking to reach an engaged, curious readership across lifestyle, tech, and consumer topics, the same readers who just spent ten minutes learning how to lock down their phones.
If you have a product, service, or story worth sharing with that audience, banner ad placements and guest post opportunities are available on the site. Visit our advertise with us page to see current options and get in touch about the right fit for your goals.
Sources
The steps above come from Google’s own Android support documentation, including pages covering the privacy dashboard, app permission changes, and Play Protect. Menu names and exact taps can shift slightly depending on your phone’s manufacturer and Android version, so when something doesn’t match exactly, check your device maker’s support site for the OEM-specific path.
FAQ
What permissions should be avoided in Android?
Avoid granting “Allow all the time” for camera, microphone, or location unless an app genuinely needs constant background access, like a navigation tool. For most apps, “While using the app” or “Ask every time” covers the real functionality without leaving a standing door open.
How do I stop my Android from spying on me?
Start with the privacy dashboard to see exactly which apps accessed your camera, microphone, or location recently, then revoke anything that looks unnecessary. Pair that with switching background location permissions to “while using the app” and keeping Google Play Protect turned on.
How do I find hidden settings on Android?
Most privacy controls sit under Settings, then Privacy, or Settings, then Security & privacy, depending on your device. If a setting still isn’t showing up, try the search bar at the top of the Settings app and type the feature name directly.
How do I make my Android private?
There’s no single switch, it’s a combination of tightening app permissions through the permission manager, setting location to approximate where possible, keeping Play Protect active, and clearing stored location and browsing history on a regular schedule. Running through that combination once a month keeps most of the risk in check.















Leave a Comment
Your email address will not be published. Required fields are marked with *