
Budget aware soundproofing for homeowners and renters: weekend fixes to seal gaps and hang heavy curtains, plus when to add mass or decoupling.
The most reliable way to tackle soundproofing a room is to seal every air gap, add mass to the surfaces letting sound through, then layer in absorption. Decoupling, the more involved structural fix, is worth reserving for home studios or seriously noisy situations. Sealing and curtains alone can noticeably calm everyday noise within a weekend and a modest budget, while full isolation closer to professional standards takes real construction work, more time, and a bigger check. We will walk through each surface, from walls to ceilings, with costs and timelines so you can pick your starting point.
TL;DR:
- Sealing gaps around outlets, doors, and windows delivers the most noticeable noise reduction at low cost and can be done in a weekend.
- Adding mass-loaded vinyl or extra drywall significantly improves sound insulation for airborne noise, especially when combined with damping compounds.
- Impact noises like footsteps require absorption materials or floating floors, as sealing and mass are less effective against them.
- Structural decoupling, such as resilient channels or room-within-a-room construction, is necessary only for serious soundproofing goals like home studios or noisy shared walls.
- Temporary fixes like heavy curtains, thick rugs, and bookcases provide quick improvements but do not replace comprehensive structural solutions for persistent noise issues.
Table of Contents
- The four principles behind every soundproofing fix
- Soundproofing walls: retrofit options and step-by-step fixes
- Fixing noisy windows without replacing them
- Sealing and upgrading doors
- Quieting floors: underlayment, rugs, and floating systems
- Ceilings: stopping noise from above
- Cheap and temporary fixes that work right away
- Advanced structural methods for serious isolation
- Materials, tools, and realistic budgets
- Hiring a contractor or doing it yourself
- Common mistakes and the sequence we recommend
- When soundproofing is actually worth the investment
- Partner with us: reach homeowners who are already renovating
- FAQ
- Sources
The four principles behind every soundproofing fix
Before buying anything, it helps to know what you are actually trying to do to the sound. Every soundproofing method, cheap or expensive, works through one of four mechanisms.
- Mass adds weight to a surface so sound waves have a harder time pushing through it, which is why extra drywall or mass-loaded vinyl outperforms a thin panel.
- Absorption uses soft, porous materials like mineral wool or dense foam to soak up sound energy inside a room, reducing echo and some airborne noise.
- Damping converts vibration into small amounts of heat using viscoelastic compounds, which is especially useful between layers of rigid material like drywall.
- Decoupling physically separates two sides of a wall, floor, or ceiling so vibration cannot travel directly from one surface to the other.
Airborne noise, voices, music, traffic, usually responds well to mass and sealing. Impact noise, footsteps, dropped objects, furniture scraping, needs decoupling or absorption at the source rather than just a thicker wall. Research into wood-frame construction backs this up: system-level choices, like frame type, cavity insulation, and how junctions are built, determine sound insulation performance far more than any single product applied after the fact, according to research on airborne sound insulation. A quick way to pick your next move: if you feel a draft or see daylight around a door or window, seal first. If sound still gets through after sealing, add mass. If the room still echoes, add absorption. If none of that is enough, it is time to think about decoupling or calling in a contractor.
Soundproofing walls: retrofit options and step-by-step fixes
Walls carry more airborne noise than almost any other surface in a home, mostly through tiny gaps around outlets, baseboards, and framing seams that most homeowners never notice.
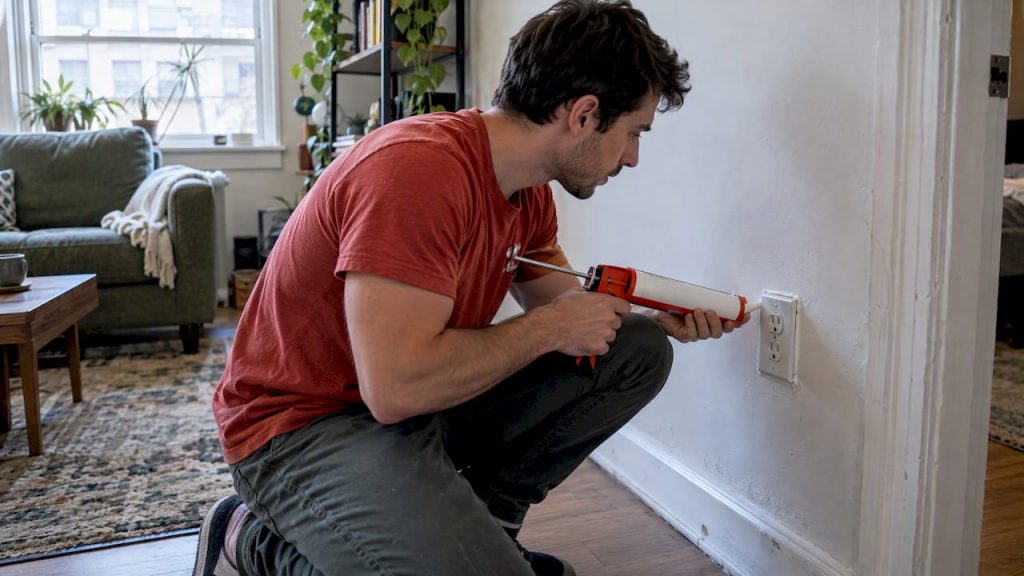
- Seal first. Run acoustic caulk around outlet boxes, baseboards, and any penetration in the drywall. This single step often produces the most noticeable improvement for the least money.
- Add mass. A layer of mass-loaded vinyl or a second sheet of drywall, ideally installed with a damping compound between layers, meaningfully cuts airborne sound without touching the framing.
- Add absorption. If the wall cavity is accessible, mineral wool batts reduce resonance and improve the overall sound rating; our guide to insulation types breaks down which material fits which situation.
- Decouple if needed. Resilient channels or a staggered or double-stud wall physically separate the two faces of the wall, which is the step that gets you closer to studio-level isolation.
Industry checklists from building-insulation groups point in the same direction: insulating wall cavities with mineral wool is a practical, homeowner-friendly step that measurably improves acoustic comfort, per the Insulating for Sound guidance from the Home Construction Regulatory Authority. For a finished wall, the realistic retrofit sequence looks like this: seal and caulk over a weekend for well under a hundred dollars, add a layer of mass-loaded vinyl and new drywall over two to three days for a few hundred dollars in materials if you do it yourself, or bring in a contractor for a full decoupled wall, which usually means a multi-day job once framing and finishing are included.
Pro Tip: Test a wall’s weak points before spending a cent: hold a lit candle near outlets, trim, and corners. If the flame flickers, that is an air leak worth sealing first.
Fixing noisy windows without replacing them
Windows are usually the thinnest, leakiest surface in a room, and in older homes they are often the single biggest source of outside noise.
- Seal and weatherstrip every gap around the sash and frame, which closes the air path sound uses most easily.
- Hang heavy, floor-length curtains on a wide rod so they cover the full window and extend well past its edges, adding mass without any construction.
- Build or buy a window plug, a fitted foam-and-fabric insert that presses into the frame, a renter-friendly option that can be removed on moving day.
- Add secondary glazing, an extra pane or acrylic panel set a few inches from the existing window, which creates an air gap that meaningfully improves sound isolation.
- Replace the window entirely with a laminated or double-pane unit when the frame itself is failing, though this is the most expensive option and best reserved for windows that are also costing you on heating bills.
To find out whether windows are your real problem, close them, stand in the room, and listen. If outside noise drops sharply with the window shut but a window plug or secondary glazing still makes an audible difference, your windows are the main path and worth prioritizing over, say, the ceiling.
Sealing and upgrading doors
Interior and exterior doors leak sound through three predictable spots: the gap under the door, the gap around the perimeter where the door meets the frame, and a hollow door panel itself.
- Install a door sweep at the bottom, which closes the single biggest gap on most doors for under $20.
- Add perimeter weatherstripping or a compression gasket around the frame to seal the sides and top.
- Use an automatic door bottom for a cleaner look than a sweep, if appearance matters.
- Swap a hollow-core door for a solid-core door when sealing alone is not enough, since a hollow door simply has no mass to block sound regardless of how well it is sealed.
Sealing a door is a same-day job that costs very little. Replacing it with a solid-core door is a bigger step, usually a few hundred dollars installed, and it only makes sense once you have confirmed sealing was not the whole answer.
Quieting floors: underlayment, rugs, and floating systems
Floor noise splits into two very different problems: impact noise (footsteps, dropped items) traveling down to the room below, and airborne noise passing sideways or upward through the floor assembly.
- Add a thick rug with a dense pad underneath, the fastest fix for impact noise in a room with hard flooring.
- Install an acoustic underlayment beneath laminate, engineered wood, or tile, which absorbs impact energy before it reaches the subfloor.
- Use a floating floor system, where the new floor sits on a resilient layer rather than being fastened directly to the subfloor, for stronger impact isolation.
- Add mass and insulation below, if you have access from below or are renovating, which helps with airborne noise moving between floors.
For most apartment dwellers, a rug and pad combination handles the bulk of impact noise cheaply and can go down in an afternoon. Underlayment under a new floor is a mid-tier project best paired with a flooring installation you were already planning, and a true floating assembly is worth the extra cost mainly in multi-story homes or above a room you want genuinely quiet.
Ceilings: stopping noise from above
A noisy ceiling usually means footsteps or voices from the room above, and the fixes mirror what works on floors, just applied from below.
- Add insulation in the ceiling cavity, mineral wool or dense fiberglass batts reduce airborne sound passing through, a step covered in our insulation for home comfort guide.
- Install resilient channels or isolation clips before hanging new drywall, decoupling the ceiling surface from the joists above for a bigger improvement than insulation alone.
- Add a layer of mass-loaded vinyl between the old ceiling and new drywall for extra blocking power without a full rebuild.
- Consider a suspended acoustic ceiling, a dropped grid with acoustic tiles, which is easier to install than resilient channels but sacrifices some ceiling height and works better on absorption than on blocking impact noise.
Resilient channels and clips deliver the bigger jump in performance but require taking the ceiling down to the joists, a job most homeowners hire out. A suspended ceiling is the DIY-friendlier route when you want some improvement without opening up the structure.
Cheap and temporary fixes that work right away
If you are renting, testing the waters, or just want results this weekend, start here before touching anything structural.
- Push a bookcase against a shared wall and fill it, the mass and irregular surface both help block and scatter sound.
- Hang heavy curtains or moving blankets over a problem wall or window for an instant, reversible improvement.
- Lay a thick rug with a dense pad on hard flooring to cut footstep noise immediately.
- Use a door draft stopper or towel under a door as a same-night fix for hallway noise.
- Build removable window plugs sized to your frames, which come out cleanly when you move.
A quick word on acoustic foam: the thin wedge-shaped panels sold cheaply online absorb mostly high-frequency sound and do very little against the low rumble of bass, traffic, or voices through a wall. Denser mineral wool panels or genuine absorbers cost more but handle a wider range of frequencies. Before committing to a bigger project, test with the cheap option: if a rug and a blanket noticeably help, you likely do not need to go further; if they barely register, the noise is probably structural and worth addressing at the source.
Pro Tip: Judge any temporary fix by comparing before-and-after with the same test, like playing music at a fixed volume in the next room, rather than trusting your memory of “it feels quieter.”
Advanced structural methods for serious isolation
When everyday fixes are not enough, usually for home recording, a shared wall with a genuinely loud neighbor, or a home theater, structural decoupling is the real answer.
- Room-within-a-room construction builds an entirely independent wall, floor, and ceiling assembly inside the existing room, touching the original structure at as few points as possible so vibration has nowhere direct to travel.
- Resilient channels, isolation clips, or a staggered-stud wall decouple surfaces without a full room-within-room rebuild, a middle ground between standard framing and full isolation.
- Damping compounds, applied between two rigid layers like drywall sheets, convert vibration into heat and work best sandwiched rather than painted on a single exposed surface.
- Combining mass, absorption, and decoupling in one assembly produces the largest realistic jump in sound isolation homeowners can achieve, though each added layer increases cost and construction time.
For anyone setting up a serious home studio, the isolation requirements go well beyond what sealing and curtains can deliver, and the planning around microphone placement, monitoring, and room treatment benefits from understanding what a home recording studio actually requires before construction begins. Full structural work is the right call when you have already tried sealing, mass, and absorption and are still unsatisfied, or when the goal from the start was professional-level isolation. Expect contractors to ask about the adjacent room’s use, the building’s construction type, and your target noise level before quoting a job that often spans one to several weeks depending on scope.
Materials, tools, and realistic budgets
A clear shopping list keeps a soundproofing project from turning into a string of unplanned trips to the hardware store.
- Mineral wool batts for cavity absorption, denser than standard fiberglass and better at a wider range of frequencies.
- Mass-loaded vinyl for adding weight to walls, floors, or ceilings without major bulk.
- Acoustic sealant or caulk for every gap, outlet, and seam, cheap and essential.
- Resilient channels or isolation clips for decoupling a ceiling or wall before hanging new drywall.
- Door seals, sweeps, and gaskets for eliminating the leaks doors almost always have.
- Acoustic underlayment for floors, matched to the flooring type going on top.
Retail how-to resources covering windows, doors, floors, walls, and ceilings generally point to the same core product list, which is reassuring confirmation that there is no secret material homeowners are missing, according to Home Depot’s soundproofing guide. For budgeting, think in three tiers: a small project, sealing plus curtains and a rug, typically runs well under $200 in materials for a single room. A medium project, adding mass-loaded vinyl or extra drywall plus cavity insulation, often costs several thousand dollars once materials and basic labor are included. A large project, decoupling or a room-within-a-room build, is a substantial undertaking costing several thousand dollars once framing, drywall, and finishing are factored in. On tools, a caulk gun, utility knife, stud finder, and basic drywall tools cover most DIY tiers; wear a dust mask and gloves when handling mineral wool or fiberglass insulation.
Hiring a contractor or doing it yourself
The right call depends less on how much noise bothers you and more on what your walls, floors, and ceilings are made of and how deep you are willing to go.
- DIY works well for sealing, curtains, rugs, window plugs, and most insulation-and-mass upgrades that do not require opening framing.
- Hire a contractor for resilient channel installation, room-within-a-room builds, or any job touching structural framing, electrical, or requiring a permit.
- Ask about measurement methods, since a contractor who can explain how they will verify improvement (not just promise a vague result) is more likely to deliver one.
- Ask for references and a written scope, including which materials they plan to use and whether there is any guarantee tied to the finished sound rating.
- Treat a vague quote as a red flag, especially one that skips any mention of sealing or decoupling and jumps straight to “more insulation” as the whole plan.
Common mistakes and the sequence we recommend
A few recurring mistakes send DIY soundproofing projects sideways: relying on thin acoustic foam as a complete solution, skipping sealing because it feels too minor to matter, and applying a fix meant for airborne noise to what is actually impact noise from footsteps above.
- Diagnose first: figure out whether the noise is airborne, impact, or both before buying anything.
- Seal every gap before spending money on bigger materials, since leaks undercut everything that follows.
- Add mass, then add absorption, in that order, matching the fix to the noise type you identified.
- Measure results after each step using a consistent test, like the same playlist at the same volume in the next room, instead of relying on impression alone.
- Consider structural options only once sealing, mass, and absorption have been tried and the remaining noise still bothers you.
This sequence mirrors what shows up consistently across homeowner forums and retail guides alike: start cheap and reversible, then escalate only as far as the remaining noise justifies.
When soundproofing is actually worth the investment
Renters get the most value from reversible fixes: rugs, curtains, door seals, window plugs, all deliver a real improvement without touching someone else’s property. Homeowners planning to stay put for years get more payback from structural work, especially on a shared wall with a loud neighbor or a home office where focus matters daily; our home office setup guide touches on why that daily comfort adds up. Resale value rarely hinges on soundproofing alone, so we would weigh any major structural project against how long you plan to live with the result, not against what a future buyer might think.
— Alexander
Partner with us: reach homeowners who are already renovating
We work with brands and content partners who want to reach readers actively researching home improvement, from soundproofing to renovation planning and everything in between. If your business serves this audience, advertising and guest post opportunities through our team connect you directly with readers at the exact moment they are making buying decisions. Reach out through that page to talk through fit, format, and placement for your next campaign.

FAQ
How can I soundproof my room cheaply?
Seal gaps around outlets, baseboards, and windows with acoustic caulk, then add a thick rug with a dense pad and heavy curtains over problem walls or windows. These reversible fixes cost relatively little and produce a noticeable improvement before any construction is needed.
How can I block noise from a shared wall?
Start by sealing every gap in the wall, then add mass with mass-loaded vinyl or an extra layer of drywall, ideally with a damping compound between layers. A loaded bookcase pushed against the wall adds further mass and helps if structural changes are not an option.
What cancels out noise in a room?
Nothing fully cancels noise in a typical room; the goal is reducing how much passes through by combining sealing, mass, absorption, and sometimes decoupling. Mineral wool and other dense absorbers soak up sound energy inside the room, while mass-loaded vinyl and extra drywall block more of what tries to pass through walls.
Can you soundproof a room that is already built?
Yes, every method described here, from sealing and curtains to adding mass, insulation, resilient channels, or a full room-within-a-room build, works as a retrofit on an existing room. The scope of what is realistic depends mostly on whether you can access wall, floor, or ceiling cavities without a full renovation.
















Leave a Comment
Your email address will not be published. Required fields are marked with *