

DIY under cabinet lighting in Canada. Spec targets (450–600 lm/ft, 90+ CRI, 3000–4000K), install steps, safety checks, and renter friendly options.
For most kitchens, continuous LED strip or linear lighting mounted at the front edge of the cabinet underside gives you the brightest, most even, shadow-free task light, with puck lights reserved for accents rather than everyday prep work. The right choice comes down to five numbers and labels: lumens per foot, kelvin, CRI, power method, and a recognized certification mark. We walk through all of it below, from hardware types to a full installation walkthrough and the safety checks worth doing before you plug anything in.
TL;DR:
- Continuous LED strip lighting provides the most even, shadow-free task light, especially for food prep zones, with recommended lumens per foot between 450 and 600.
- Mounting the fixtures toward the front edge of cabinets, about one to two inches back, minimizes shadows caused by your own body during use.
- For proper safety and certification, fixtures and adapters should carry CSA, cUL, or cETL marks, and avoid running too many fixtures off a single outlet or extension cord.
- DIY installation suits plug-in kits and puck lights, but hardwired or concealed wiring projects require a licensed electrician to ensure safety and compliance.
- Matching the color temperature (3000K to 4000K) and CRI rating to your kitchen style enhances overall ambiance and consistency, whether traditional or contemporary.
Table of Contents
- Types of under cabinet lighting and what each one does best
- How to choose: lumens, kelvin, CRI, dimming, and power
- Step-by-step installation overview for LED strip or linear bar
- Positioning and layout: spacing, placement, and avoiding shadows
- Energy, longevity, and maintenance
- Safety, code, and certification notes for homeowners
- Our team’s practical recommendations and quick shopping checklist
- Compatibility with kitchen design styles and cabinet materials
- How under cabinet lighting shapes ambiance and layers with other fixtures
- When to do it yourself and when to hire a licensed electrician
- FAQ
- Sources
Types of under cabinet lighting and what each one does best
Under cabinet lighting falls into four hardware families, and each one solves a slightly different problem.
LED tape or strip lighting is a flexible circuit board wrapped in an LED array, sold by the foot or in pre-cut reels. It creates a continuous wash of light along the whole run, which is why it’s the default pick for food prep zones. Because it’s flexible, it can curve around corner cabinets or follow an uneven cabinet line, something rigid fixtures can’t do.
Linear light bars are pre-made aluminum fixtures, often 12 to 24 inches long, that click together end to end. They trade a little flexibility for a cleaner, more finished look straight out of the box, since the diffuser and housing are already built in. If you want a tidy install without cutting or soldering anything, this is the easier route.
Puck or button lights are small, round fixtures, usually 2 to 3 inches across, installed individually at set intervals. They’re better for accenting a feature, a wine rack, a decorative backsplash section, than for lighting a full countertop, because the light pools under each puck and leaves dimmer gaps between them.
Integrated modules and recessed strips are built into the cabinet during manufacturing or a full renovation, sitting in a milled groove so the fixture sits flush with the cabinet underside. They look the cleanest of all four options but only make sense when you’re already replacing or building new cabinetry.
- LED strip/tape: best for continuous task lighting and curved runs.
- Linear bars: best for a fast, finished-looking install with no splicing.
- Puck lights: best for accents and small display areas.
- Integrated modules: best when cabinets are new or being rebuilt.
How to choose: lumens, kelvin, CRI, dimming, and power
Once you know the hardware type, the shopping decision comes down to matching specs to how you actually use your counter.
Lumens per foot is the single most useful number on the packaging. For genuine task lighting, where you’re chopping, reading labels, or working close to the counter, look for lumens per foot of run in a range suited to effective visibility. Anything much lower reads as decorative glow rather than usable work light.
Kelvin describes color temperature, and it changes how the light feels as much as how bright it is. A range of 3000K to 4000K covers most kitchens: 3000K leans warm and cozy, closer to incandescent light, while 4000K reads crisper and more neutral, which tends to suit food prep and white or light-colored counters. Neither is objectively correct, it’s a matter of matching the rest of your kitchen’s lighting so the whole room feels like one consistent plan rather than a patchwork.
CRI, or color rendering index, measures how accurately a light source shows true color. The Illuminating Engineering Society treats 80+ CRI as acceptable for general kitchen tasks, and recommends pushing to 90+ when color fidelity actually matters, like checking whether chicken is fully cooked or whether a sauce has the right color. Cheap strip lighting often skips this spec entirely, which is itself a signal to look elsewhere.
Dimming sounds simple until the driver and the dimmer don’t speak the same language. Many flicker or fail outright when paired with an incompatible dimmer, so confirm the driver is explicitly listed as dimmable and matches the dimmer’s protocol before you buy either piece.
Power options split three ways:
- Plug-in kits run off a standard outlet, need no electrician, and suit renters or anyone avoiding wall work.
- Hardwired fixtures tie into your home’s wiring for a cleaner look with no visible cord, but they call for an electrician in most cases.
- Low-voltage driver systems step household voltage down to run LED tape safely, and they’re the backbone of most strip installations, whether plugged in or hardwired.
Before buying anything, check the fixture and its power adapter for a CSA, cUL, or cETL mark. Electrical products sold for Canadian homes should carry one of these certifications, and products without them haven’t been assessed for the hazards that matter most near a kitchen sink or stove, moisture and heat.
Pro Tip: Buy a few extra feet of LED strip beyond your measured run length so a miscut or a bad connector doesn’t stall the whole project.
Step-by-step installation overview for LED strip or linear bar
A careful DIY strip or bar install usually takes an afternoon, and most of that time goes into prep rather than the actual mounting.
- Measure and plan. Measure each cabinet run, note where outlets or switches will sit, and sketch where connectors and power leads need to land.
- Gather tools. You’ll want a tape measure, a utility knife or strip-specific cutting scissors, wire strippers, a small screwdriver set, double-sided mounting tape or clips, and safety glasses.
- Choose a mounting method. Decide between surface-mounting an aluminum channel to the cabinet underside or routing a recessed groove if you’re comfortable with that level of woodworking.
- Mount the channel. Attach the aluminum channel with screws or strong adhesive, keeping it set back from the cabinet’s front lip enough to stay hidden from normal viewing angles.
- Cut the LED tape at marked points only. Strip lighting has designated cut lines, usually every 2 to 4 inches, and cutting anywhere else damages the circuit.
- Join sections with care for polarity. Use quick connectors for a tool-free join, or solder for a more permanent, lower-resistance connection, matching positive to positive and negative to negative every time.
- Protect cut ends. Seal exposed ends with the connector’s built-in cap or a dab of silicone, especially near sinks where moisture is a real risk.
- Connect power. Route a plug-in adapter to the nearest outlet, wire into a discrete under-cabinet switch, or, for a hardwired setup, stop here and hand the final connection to a licensed electrician.
- Test before final mounting. Power the run and check for even brightness along its full length before you commit to adhesive or screws.
- Secure and tidy wiring. Press the tape into the channel, snap on the diffuser cover if included, and clip or tape loose wire runs out of sight.
If something’s wrong at the test stage, the usual culprits are simple:
- Flickering often points to a dimmer and driver that aren’t actually compatible.
- No light at all is usually a polarity mismatch at a connector or a loose plug.
- Dim or uneven sections suggest a bad connector joint or a run that’s longer than the driver’s rated capacity.
Positioning and layout: spacing, placement, and avoiding shadows
Where you mount the light matters nearly as much as which light you buy. The Natural Resources Canada lighting design guide recommends placing task lighting toward the front edge of the cabinet underside, which throws light down and slightly forward onto the counter instead of straight down against the backsplash, and that front offset is what keeps your own hands and head from casting a shadow over the cutting board.
- Mount strip lighting a short distance back from the front cabinet edge to best control shadows on the work surface.
- Space puck lights 8 to 12 inches apart to avoid visible dark gaps between fixtures.
- For countertops deeper than 25 inches, consider a double run or brighter strip to keep the back of the counter from falling dim.
- Light-colored or glossy backsplashes bounce more light back into the room, so you can often use a slightly lower lumen count than you would with dark stone or matte tile.
Beyond the main counter, the same hardware handles accent jobs: glass-front cabinets benefit from softer, lower-lumen strips that highlight dishware without glare, toe-kick lighting adds a low ambient glow for nighttime kitchen trips, and open shelving uses the same front-edge placement logic as standard cabinets to light what’s displayed underneath.
Energy, longevity, and maintenance
LED fixtures lose brightness gradually over years of use rather than failing all at once, a process called lumen depreciation, and a good driver paired with solid heat sinking slows that decline considerably. This is part of why LED lighting tends to outlast older bulb technology by a wide margin, and it’s also why the channel you mount it in matters: aluminum channels pull heat away from the LEDs, which protects both brightness and lifespan, while also giving the finished install a cleaner edge than bare tape stuck to wood.
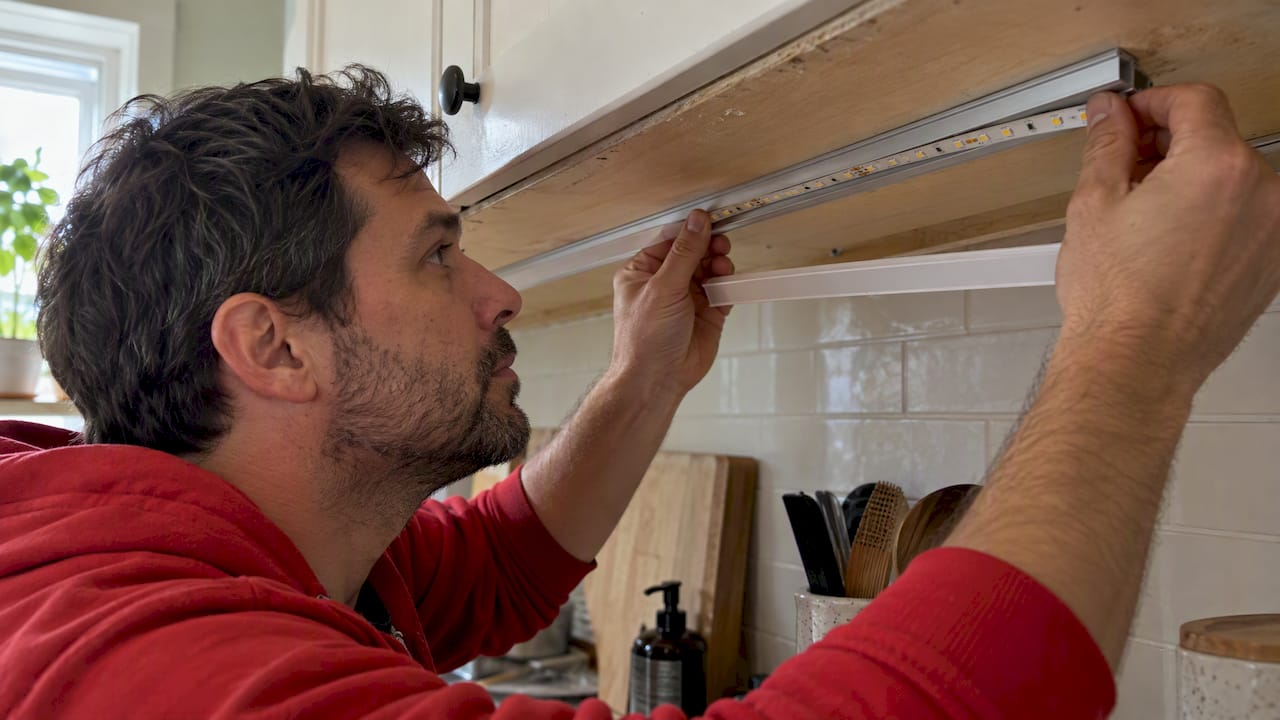
Cleaning is simple: wipe strips and bars occasionally with a dry or barely damp cloth, and keep anything mounted near a sink shielded from direct splashing regardless of its rated moisture resistance. Watch for two warning signs that it’s time to replace parts: visibly dimming sections that don’t respond to cleaning, and any flickering that persists after you’ve ruled out a dimmer mismatch, since that usually points to a failing driver rather than the LEDs themselves.
Safety, code, and certification notes for homeowners
Before anything gets mounted or plugged in, confirm the fixture and its power adapter carry a recognized certification mark. Certified electrical products for Canadian homes should bear a CSA, cUL, or cETL mark, and products missing one haven’t been evaluated for the shock and fire risks that matter most in a space with water and heat nearby.
For anything involving code questions or a formal inspection, your provincial or territorial electrical safety authority is the right contact rather than guesswork, and CSA Group publishes the underlying standards those authorities reference.
Common mistakes worth avoiding:
- Running too many fixtures off a single outlet or extension cord.
- Using an uncertified or mismatched driver because it was cheaper.
- Skipping sealant on cut ends near a sink, inviting corrosion over time.
Our team’s practical recommendations and quick shopping checklist
Before checkout, confirm these specs match your plan: lumens per foot, kelvin range, CRI rating, a certification mark, a dimmable rating if you want dimming, an IP rating if the run sits near a sink, and a mounting channel that fits your cabinet depth.
Three scenarios cover most kitchens. For continuous task lighting over a main prep counter, look for 450 to 600 lumens per foot, 4000K, 90+ CRI, and an aluminum surface-mount channel. For an accent retrofit on glass cabinets or open shelving, a lower-lumen, 3000K puck or mini-strip kit does the job without overpowering the display. For a renter-friendly setup, a plug-in strip kit with a battery or USB option avoids any wiring at all. For more on how these fixtures compare to older bulb types and where layered lighting fits into a broader kitchen plan, our related guides cover the groundwork in more depth.
Pro Tip: Keep the packaging and receipt until the lights have run for a full week, since early driver failures usually show up fast.
— Alexander
Compatibility with kitchen design styles and cabinet materials
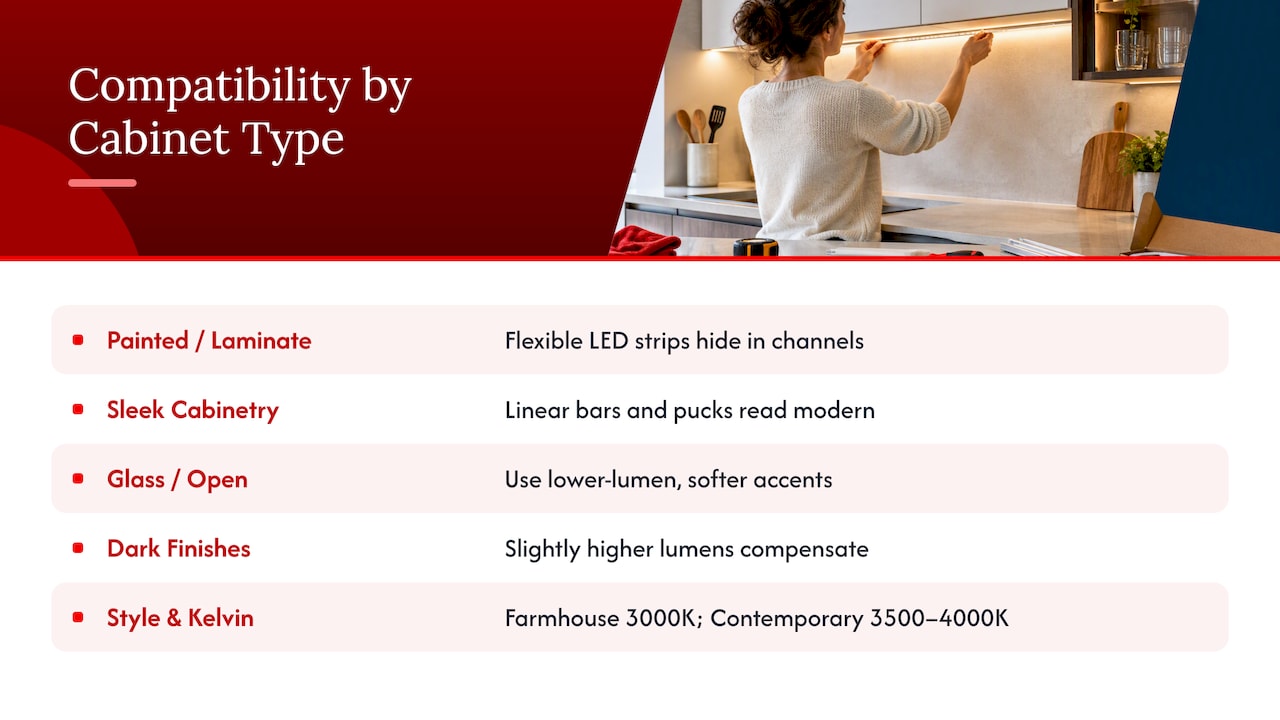
Under cabinet lighting adapts to nearly any kitchen style, but the hardware you pick should match the cabinet material and finish. Flexible LED strip works well on painted wood, laminate, and most standard cabinet boxes, since it hides inside a channel regardless of the surface underneath. Linear bars and puck lights, being rigid and visible, read more modern on sleek, handle-less cabinetry and more traditional when paired with warmer wood tones and a lower kelvin setting.
Glass-front cabinets and open shelving call for softer, lower-lumen accents rather than full task-level brightness, since the goal is to highlight contents rather than flood the shelf. Dark or matte cabinet finishes tend to absorb more light, so a slightly higher lumen count compensates where a glossy white cabinet wouldn’t need it. Farmhouse and traditional kitchens often lean toward 3000K for a warmer glow that matches wood tones and brass or bronze hardware, while contemporary kitchens with white quartz or stainless accents usually suit 3500K to 4000K better. None of this changes the underlying specs you’re shopping for, it just shifts which end of the kelvin and lumen ranges fits the room.
How under cabinet lighting shapes ambiance and layers with other fixtures
Under cabinet lighting rarely works alone, and it isn’t meant to. The Natural Resources Canada guide frames kitchen lighting as a layered system: ambient overhead light fills the room, task lighting under the cabinets handles close work, and accent lighting, inside glass cabinets or along a toe kick, adds depth and mood once the practical work is done.
Relying on overhead fixtures alone tends to throw your own shadow across the counter exactly where you need light most, which is the core reason task lighting under the cabinet front exists in the first place. Once that layer is in place, under cabinet lights do double duty as ambiance: dimmed low in the evening, they turn a kitchen into a soft-lit space without flipping on bright overhead fixtures, an effect many homeowners come to use more often than the daytime task lighting it was installed for. Pairing a dimmable under cabinet system with separately controlled overhead and accent layers gives you the most flexibility, since each layer can be adjusted for the moment rather than forcing one fixture to do every job in the room.
When to do it yourself and when to hire a licensed electrician
Plug-in kits, surface-mounted strips, and battery or USB-powered pucks are safe, straightforward DIY projects for most homeowners. Hardwiring into existing circuits, modifying a circuit’s capacity, or running concealed wiring behind walls or cabinetry crosses into work a licensed electrician should handle, both for safety and because that work often triggers permit or inspection requirements. Weigh the modest cost of hiring out against the real risk of fire or shock from a wiring mistake, and if you’re coordinating the work with a kitchen remodeler, tools built for that trade can help keep the project organized. Document fixture models and certification marks before any inspection.
FAQ
What is the best type of lighting for under cabinets?
Continuous LED strip or linear bar lighting is best for everyday task lighting, since it spreads light evenly along the whole counter instead of leaving gaps. Puck lights work better as accents for display areas rather than as the main work light.
Should under-cabinet lighting be 3000K or 4000K?
Either works, and the right choice depends on your kitchen’s overall tone: 3000K gives a warmer, cozier feel that suits traditional kitchens and wood cabinetry, while 4000K reads crisper and often suits food prep and lighter, more contemporary counters. Matching it to your other kitchen lighting keeps the room feeling consistent.
What is the best position for under-cabinet lighting?
Mounting the fixture toward the front edge of the cabinet underside, rather than centered or toward the back, reduces shadows that your own body or head would otherwise cast over the counter. A one to two inch setback from the front edge is a reliable starting point for most cabinet depths.
How do I install under-cabinet lighting?
Measure your cabinet runs, mount an aluminum channel to the underside, cut LED tape only at its marked cut points, join sections with connectors or solder while matching polarity, and test before final securing. Plug-in and battery kits need no electrician, but hardwiring into your home’s circuits should go to a licensed professional.
Sources
For code and certification questions, provincial electrical safety authorities and CSA Group publish the governing standards, while Natural Resources Canada covers layered lighting design in more depth.
















Leave a Comment
Your email address will not be published. Required fields are marked with *