

Discover effective note taking methods to enhance your learning. Explore 10 strategies, including Cornell and mapping, to maximize your study time.
For most courses, start with Cornell or outlining, then add mapping or charting once you know the material’s shape. A good note-taking method does five things well: it captures what matters, organizes ideas, compresses information, supports review, and pushes you to think. According to research on what makes methods effective, the real differentiator is not which method you pick but whether you process your notes after class. Pick one method from this list, try it for two weeks, and add a 15-minute post-class edit to whatever you choose.
Top methods at a glance:
- Cornell — structured review
- Outlining — linear, fast hierarchy
- Mapping — visual relationships
- Charting — comparisons and data
- Sentence — rapid capture
Key Takeaways
The most effective note-taking approach pairs a method matched to your material with a consistent post-class review habit — motivation and consolidation matter more than which system you choose.
| Point | Details |
|---|---|
| Match method to material | Use outlining for linear content, charting for comparisons, and mapping for relational topics. |
| Cornell beats sentence at retention | A 134-participant RCT found Cornell outperformed Sentence at retention; motivation predicted results most strongly. |
| Post-class editing is non-negotiable | A 10–20 minute edit window after class converts raw capture into study-ready notes. |
| Retrieval practice drives recall | Turn cue column entries and summary lines into active recall questions and review them on a spaced schedule. |
| Test two methods over four weeks | Track review time and self-test scores to find the method that fits your workflow, not just your subject. |
Table of Contents
- 1. The Cornell method gives you a built-in study tool.
- 2. Outlining captures hierarchy fast in structured lectures
- 3. Mapping reveals relationships that linear notes miss
- 4. Charting sets up comparisons so review almost does itself
- 5. The sentence method is the fastest capture tool you have
- 6. Three useful variants worth knowing: column notes, boxing, and guided templates
- 7. Digital vs. paper notes: which one actually helps you learn?
- 8. How to choose the right method for your course and goals
- 9. How to review notes for better retention
- 10. What the research actually says about method effectiveness
- How to mix and customize methods for your learning style
- Common pitfalls in note-taking and how to sidestep them
- Abbreviations and shorthand that speed up your notes
- Our team’s perspective: how we recommend testing methods
- Sources
1. The Cornell method gives you a built-in study tool.
The Cornell Note Taking System divides each page into three zones. A summary row at the bottom, two to three inches tall, holds a two-sentence synthesis of the page’s main idea.
Here is what goes in each zone:
- Notes column: main ideas, examples, diagrams, and key terms as the lecture unfolds
- Cue column: questions that the notes answer, vocabulary words, or concept labels you add within 24 hours of class
- Summary row: one to two sentences in your own words that capture the page’s core point
After-class review checklist:
- Within 24 hours, read through your notes column and fill in the cue column.
- Cover the notes column and use the cue column prompts to recite answers aloud.
- Write the summary row without looking at your notes.
- Schedule a second review in three to five days using only the cue column as your prompt.
Pro Tip: Each cue column entry is a ready-made flashcard. Cover the right side, read the cue, and answer aloud before checking. This is retrieval practice built directly into your page layout.
2. Outlining captures hierarchy fast in structured lectures
Outlining works by mirroring the logical structure of a lecture or textbook chapter. You mark the top level with a Roman numeral or a bold heading, indent one level for supporting points, and indent again for details or examples. Most students use a simple three-level system: main topic, subtopic, and supporting detail.
A short example looks like this:
I. Photosynthesis
A. Light-dependent reactions
i. Occur in the thylakoid membrane
ii. Produce ATP and NADPH
B. Calvin cycle
i. Occurs in the stroma
ii. Fixes CO₂ into glucose
The method’s biggest strength is speed. When a professor moves through material in a clear sequence, you can keep pace without stopping to draw or reorganize. The weakness shows up in courses where ideas connect in webs rather than chains — philosophy seminars, case-based law classes, or creative writing workshops. Forcing non-linear content into a rigid hierarchy often strips out the relationships that matter most. For those subjects, mapping or charting will serve you better.
3. Mapping reveals relationships that linear notes miss
A concept map puts the central idea in the middle of the page and branches outward. Each branch is a related concept, and connecting lines carry a short label that names the relationship (“causes,” “leads to,” “contrasts with”). The result looks like a web, not a list, and that structure is the point.
How to draw a basic map during or after class:
- Write the lecture’s main topic in a circle at the center of a blank page.
- Draw a line outward for each major subtopic and label it.
- Branch secondary ideas off each subtopic line.
- Add short relationship labels on every connecting line.
- Use arrows to show direction when a relationship is one-way.
- After class, add color to group related branches and highlight gaps.
Mapping works best when you are studying relationships between concepts, brainstorming for an essay, or building a one-page exam synopsis. For tools, free web apps like Miro and Coggle are available to Canadian students and work on any browser. A blank sheet of paper and a few colored pens work just as well, and many students find the physical act of drawing helps retention.
Pro Tip: Assign one color per theme before you start. When you review, the color groupings let your eye jump to a topic cluster instantly, which speeds up retrieval practice.

4. Charting sets up comparisons so review almost does itself
The charting method, sometimes called the matrix method, organizes information into a grid. Column headers name the categories you want to compare; rows name the items or cases. Every cell holds a short fact, date, or phrase. The structure forces you to notice what is missing and to compare across rows at a glance.
For a history course, your column headers might be: Event / Date / Cause / Key Figures / Outcome. For a comparative law course: Jurisdiction / Rule / Exception / Leading Case. For a biology lab: Organism / Habitat / Adaptation / Ecological Role.
Use-case bullets:
- History timelines with multiple actors and overlapping events
- Comparative policy or law where jurisdictions share the same legal questions
- Lab courses comparing experimental conditions, variables, and results
- Pharmacology notes comparing drug classes, mechanisms, and side effects
5. The sentence method is the fastest capture tool you have
The sentence method is exactly what it sounds like: you write each new thought as a numbered sentence on its own line. No hierarchy, no indentation, no structure during capture. The goal is to keep pace with a fast-moving lecture without missing anything.
Raw sentence notes from a 10-minute segment might look like this:
-
- Supply and demand curves intersect at equilibrium price.
-
- A price ceiling set below equilibrium causes shortage.
-
- Example: rent control in Toronto reduced housing supply over time.
-
- Price floors set above equilibrium cause surplus.
-
- Example: agricultural subsidies in Canada.
After class, you reorganize those sentences into an outline or a Cornell page. That editing step is where the learning happens. The biggest trap with the sentence method is treating the raw capture as finished notes. Verbatim sentences copied at speed are hard to study from because they carry no hierarchy and no emphasis. Budget 15 minutes after class to group related sentences, add headings, and cut anything redundant.
Post-class editing checklist:
- Group related sentences under a shared heading.
- Delete sentences that restate the same point.
- Add one bold keyword per group to make scanning faster.
- Write a two-sentence summary at the top of the page.
6. Three useful variants worth knowing: column notes, boxing, and guided templates
Parallel (column) notes split the page vertically. One column holds the instructor’s slide content or handout points; the other holds your own explanations, questions, or connections. This method is ideal for handout-driven lectures where the professor’s structure is already given to you. Research on the parallel method describes it as a way to balance capture and processing simultaneously.
Boxing draws a box around each distinct topic as you write. When the professor shifts to a new idea, you close the current box and open a new one. The visual separation makes it easy to find topics during review without re-reading everything. It works well for students who think spatially and find linear pages hard to navigate.
Guided (template) notes are pre-built outlines your instructor provides, usually with blank spaces for key terms and examples. When your professor offers them, use them — they signal what the course considers most important. Fill the blanks during class, then add your own annotations in the margins.
Combining variants is often the smartest move. You might use a guided template during lecture, then convert your filled-in template into a Cornell page for review.
Pro Tip: If your instructor posts slides before class, print them three-per-page with a blank column on the right. You get guided notes and a cue column in one step.
7. Digital vs. paper notes: which one actually helps you learn?
The honest answer is that both work, and the format matters less than what you do after class. That said, each has a clear edge in specific situations.
When digital wins:
- You need to search across weeks of notes quickly.
- The course involves multimedia (audio, images, PDFs you annotate).
- You collaborate with classmates on shared documents.
- You type faster than you write and can keep pace with a fast lecturer.
When paper wins:
- You want to reduce distraction (no notifications, no browser tabs).
- The subject involves diagrams, equations, or spatial layouts.
- Research suggests keyboard-based capture often leads to verbatim transcription and shallower processing unless you actively paraphrase.
For Canadian students choosing apps, the most widely used options each have a distinct strength. Notion works well for students who want a flexible workspace with databases and linked pages. Apple Notes and Google Keep are free, sync instantly, and require zero setup. Microsoft OneNote supports ink input on tablets and integrates with Microsoft 365, which many Canadian universities provide. Evernote remains a strong choice for web clipping and cross-device search. If you are deciding between a tablet and a laptop for digital notes, our tablet vs. laptop comparison covers the hardware tradeoffs in detail.
Digital note-taking do/don’t checklist:
- Do disable notifications before class starts.
- Do use a template (Cornell, outline) so structure is built in.
- Do paraphrase rather than copy the professor’s exact words.
- Don’t treat a typed transcript as finished study material.
- Don’t open browser tabs unrelated to the lecture.
Pro Tip: Set a 10–20 minute editing window immediately after class. Convert raw digital capture into paraphrased, organized notes before the memory fades. This single habit produces bigger retention gains than any app feature.
Personal fit and ease of use matter more than feature lists when choosing an app. Try two or three options for a week each, then commit to the one that fits your device and workflow.
8. How to choose the right method for your course and goals
Ask three questions before you pick a method: Is the content linear or relational? How fast does the lecture move? Will you need to compare facts or synthesize ideas for the exam?
A pragmatic framework from methodology research maps content type to method: use outlining for linear content, charting for comparative content, mapping for relational content, and Zettelkasten-style atomic notes for long-term synthesis across sources. Zettelkasten, which links short “atomic” notes across a personal knowledge base, is powerful for thesis writing and research projects but too slow for live lecture capture.
| Method | Best for | Setup | Main strength | Main limit | Review approach |
|---|---|---|---|---|---|
| Cornell | Most lecture courses | Divide page into 3 zones | Built-in self-test | Slower during fast lectures | Cue column recall |
| Outlining | Structured, linear content | Indent by level | Fast, clear hierarchy | Weak for relational topics | Re-read and summarize |
| Mapping | Relational, conceptual topics | Central node + branches | Shows connections | Hard to use at lecture speed | Redraw from memory |
| Charting | Comparative, data-heavy courses | Column headers + rows | Easy cross-comparison | Requires known categories | Scan rows, fill gaps |
| Sentence | Fast lectures, any subject | Numbered lines | Maximum capture speed | Needs post-class editing | Reorganize into outline |
Three quick scenarios:
History seminar: Content is comparative and event-heavy. Use charting during lecture, then convert to a Cornell page for review.
Calculus lecture: Content is linear and procedural. Outlining keeps pace with worked examples; leave wide margins for your own worked steps.
Lab course: Content is observational and comparative. A matrix with columns for variables, conditions, and results captures data cleanly and makes lab report writing faster.
9. How to review notes for better retention
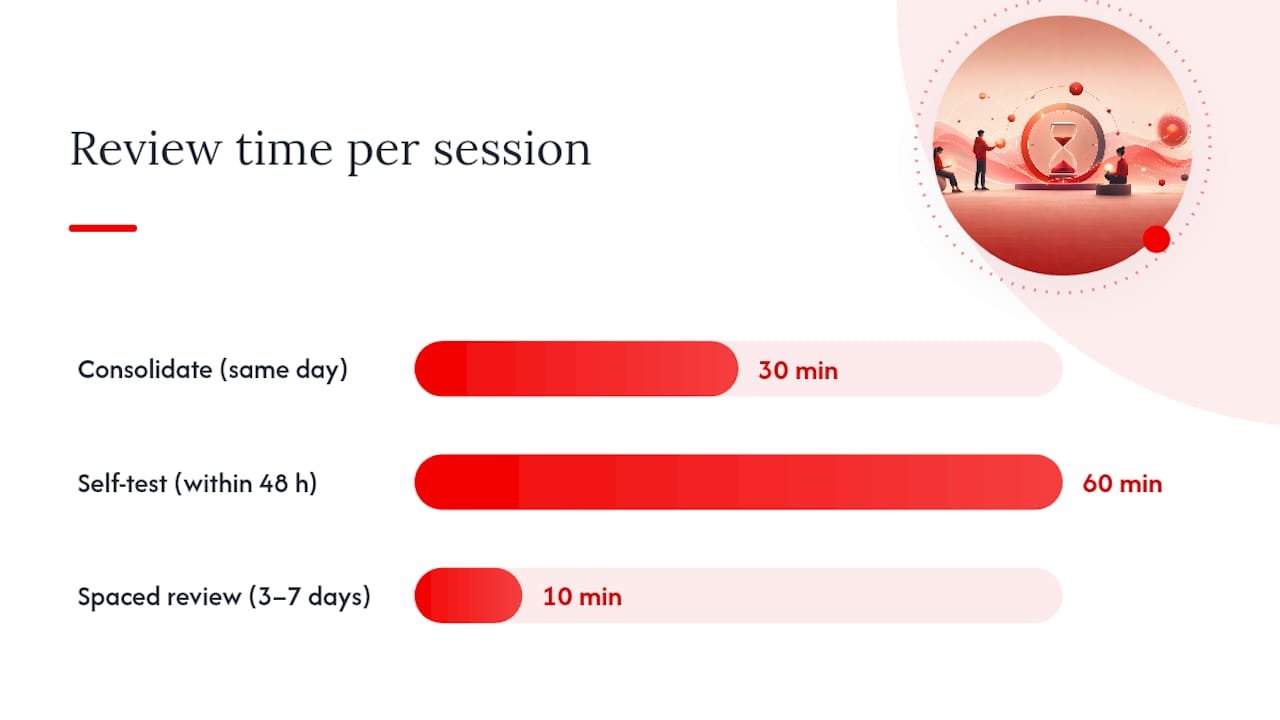
Capturing notes is only half the job. The review routine you build after class determines how much actually sticks. A simple structure: spend 30 minutes on immediate consolidation the same day, 60 minutes on deeper self-testing within 48 hours, and 10 minutes on a spaced review three to seven days later.
Step-by-step review plan:
- Consolidate (same day, 30 min): Read through your notes, fill in gaps, and add headings or cue column entries you skipped during class.
- Summarize (within 48 hours, 20 min): Write a half-page summary in your own words without looking at your notes. Check it against the original.
- Self-test (within 48 hours, 40 min): Cover your notes and answer each cue column prompt or heading aloud. Mark anything you could not answer.
- Schedule spaced reviews: Review marked items again in three days, then seven days, then two weeks. Each review should be shorter than the last.
Practical retrieval tools that work well for Canadian students include Anki (free, open-source, available on all platforms) for spaced-repetition flashcards, and RecallOS, which converts notes directly into study packs. Explaining a concept aloud to a study partner, sometimes called the Feynman technique, is one of the most reliable ways to find gaps in your understanding.
Pro Tip: Convert every cue column entry or summary line into an active recall prompt by turning it into a question. “Photosynthesis” becomes “What are the two stages of photosynthesis and where does each occur?” That one reframe turns passive review into genuine self-testing.
10. What the research actually says about method effectiveness
A randomized controlled study with 134 participants compared Cornell, Parallel, Digital, and Sentence methods over five weeks. The headline finding is sobering: retention differences between methods were small. At the retention test, only the Cornell group scored significantly higher than the Sentence group. The strongest predictor of retention across all groups was motivation, not cognitive load, and not the method itself.
| Study detail | Value |
|---|---|
| Sample size | 134 participants |
| Intervention length | 5 weeks |
| Methods compared | Cornell, Parallel, Digital, Sentence |
| Retention finding | Cornell > Sentence; other differences not significant |
| Strongest predictor | Motivation (not cognitive load) |
Understanding how note-taking formats interact with mental effort is worth exploring further. Cognitive load theory explains why overly complex layouts can actually slow learning — the format itself can consume mental resources that should go toward understanding the content.
Key takeaways from the evidence:
- No single method dramatically outperforms all others for every student.
- Post-class consolidation and motivation are the highest-leverage variables.
- Cornell’s advantage over Sentence is real but modest; its built-in review structure is the likely driver.
- Matching method to material type (linear, comparative, relational) is more important than picking the “best” method in the abstract.
How to mix and customize methods for your learning style
Modern research debunks strict learning-style prescriptions — the idea that you are a fixed “visual” or “auditory” learner who needs one specific format. What actually works is matching the method to the material, then adjusting for your own pace and preferences.
A practical starting point: use outlining or Cornell during lecture for speed and structure, then convert your notes into a map or matrix during review for synthesis. This two-phase approach separates capture from processing, which is where most students lose ground. If you find that a pure Cornell layout feels rigid, try a hybrid: use the two-column split but replace the summary row with a mind map of the page’s key relationships.
Experiment deliberately. Run one method for two weeks in one course, track how long review takes and how well you perform on quizzes, then try a second method in the same course for the next two weeks. The Adobe guide to note-taking methods catalogs ten styles with use-case guidance, which makes it a useful reference when you want to try something new.
Common pitfalls in note-taking and how to sidestep them
Transcribing instead of thinking. Copying the professor’s words verbatim feels productive but produces notes that are hard to study from. Paraphrase in real time, even if it means missing a detail. You can fill gaps after class.
Never reviewing. Notes that sit untouched until the night before an exam are almost useless. The UTC Center for Academic Support recommends leaving wide margins and white space specifically so you have room to add synthesis and questions during your first review pass.
Switching methods every week. Changing systems before you have given one a fair trial prevents you from building the habit that makes any method effective. Commit to two weeks minimum.
Treating digital capture as finished notes. A typed transcript is raw material, not a study tool. The post-class editing step is non-negotiable for digital workflows.
Over-organizing during class. Spending lecture time color-coding and formatting pulls attention away from understanding. Capture first, organize after.
Abbreviations and shorthand that speed up your notes
A personal shorthand system can cut your writing time significantly without sacrificing meaning. The key is consistency: an abbreviation you invented last month and forgot is worse than writing the full word.
Standard symbols worth adopting:
- → means “leads to” or “causes”
- ↑ / ↓ means “increases” or “decreases”
- ≈ means “approximately”
- w/ means “with,” w/o means “without”
- b/c means “because,” b/w means “between”
- def means “definition,” ex means “example”
- ∴ means “therefore,” ∵ means “because” (logic and math courses)
For subject-specific terms you use repeatedly, create your own abbreviations on the first day of the course and write a key at the front of your notebook. “Photosynthesis” becomes “PS,” “government” becomes “gov’t,” “Canadian Charter of Rights and Freedoms” becomes “CCRF.” The rule is simple: if you write a term more than five times per lecture, it needs a shorthand.
Avoid abbreviating so aggressively that your notes become unreadable two weeks later. Test your shorthand by reading a page of notes 48 hours after writing it. If you cannot decode it fluently, simplify.
Our team’s perspective: how we recommend testing methods
Our team at Lizard’s Lunch recommends picking two methods that feel genuinely different from each other — say, Cornell and mapping — and running a structured four-week comparison. Use Cornell in one course and mapping in another for the first two weeks, then swap them for the next two weeks. Track three things each week: how long your post-class review takes, how many cue column prompts or map branches you can recall without looking, and your quiz or assignment scores.
Mini-experiment template:
“Success” is not just the grade. If one method cuts your review time in half while maintaining the same recall rate, that is a win worth keeping. The goal is a method that fits your material and your schedule, not the one that looks most impressive on paper. For students turning raw lecture notes into polished study materials, the BoardMaster workflow guide offers a practical framework for that transformation.


















Leave a Comment
Your email address will not be published. Required fields are marked with *