

Compare Level 1 and Level 2 home charging in Canada, including your EV’s onboard limit, installation costs, and rebates before taking delivery.
For most daily EV drivers, a professionally installed Level 2 charger is the practical default, because it refills a typical battery overnight. Level 1 works for plug-in hybrids and very low-mileage drivers. Natural Resources Canada backs that view, and below we cover the car’s onboard limit, installation realities and rebates.
TL;DR:
- Government guidance estimates Level 1 adds about 8 km per hour, compared with roughly 30 to 50 km for Level 2, depending on conditions.
- Your car’s onboard AC charger caps Level 2 speed, commonly between 6.6 kW and 11.5 kW; a larger circuit cannot overcome that limit.
- Installation ranges from $200 for simple upgrades to over $1,500 for complex work; request a load calculation and permit before authorizing any panel upgrade.
- Some provincial programs cover up to 50% of installation costs, but check eligibility and apply for approval before work begins.
- For continuous charging, electricians recommend setting the unit’s current limit to 80% of breaker rating; a 50 A breaker therefore runs it at 40 A.
Table of Contents
- What are the key differences between Level 1 and Level 2 charging?
- How does Level 1 charging work, and when does it make sense?
- How does Level 2 charging work at home?
- How much range does each level actually add?
- What does installing a Level 2 charger involve?
- What does home charging really cost, and what rebates exist?
- How do you choose between Level 1 and Level 2 in three questions?
- What should you expect day to day with each option?
- Our final take: start with the car, then check the panel
- FAQ
- Sources
What are the key differences between Level 1 and Level 2 charging?
Think of this as your quick snapshot before we dig into the details. The two levels differ in voltage, speed, hardware and the kind of driver they suit best.
- Voltage and connection: Level 1 runs on 120 V AC through a standard household outlet. Level 2 runs on 240 V AC through a dedicated circuit, much like the one feeding an electric stove or dryer.
- Range added per hour: Government guidance puts Level 1 at about 8 km of range per hour, while Level 2 commonly adds roughly 30 km to 50 km per hour.
- Time to full: Level 2 can typically refill most EV batteries in 4 to 10 hours, depending on battery size and charger output.
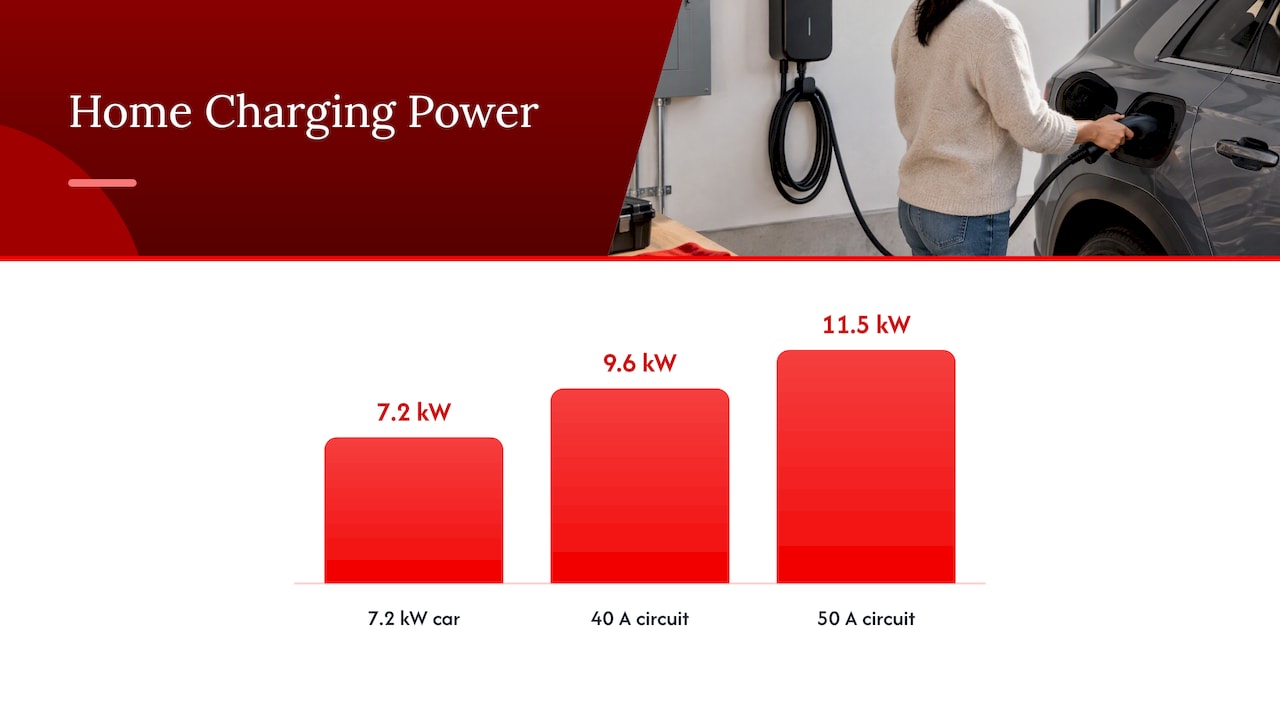
- Typical power: A home Level 2 circuit usually uses a 40 A or 50 A breaker, which works out to roughly 9.6 kW or 11.5 kW of supply. Level 1 delivers a small fraction of that.
- Equipment: Level 1 usually needs nothing beyond the cordset that ships with the car. Level 2 needs a charger or outlet, a new breaker and wiring, and usually a licensed electrician.
- Best for: Level 1 suits plug-in hybrids, drivers under roughly 40 to 50 km a day, and backup use. Level 2 suits nearly everyone else who can charge at home.
In short, Level 1 is the “it just works” option, and Level 2 is the “never think about it again” option.
How does Level 1 charging work, and when does it make sense?
Level 1 charging is as simple as it gets. You plug the cordset that came with your car into a regular 120 V outlet, and the car starts adding range. No installation, no permit, no waiting on a contractor.
The tradeoff is time. At about 8 km of range per hour, charging adds range gradually, so whether an overnight session is enough depends on your driving needs. That is plenty for a short commute and a few errands, and far too little if you regularly cover long distances.
According to Natural Resources Canada, Level 1 is best suited to plug-in hybrids or drivers with very low daily mileage, under about 40 to 50 km. The same agency notes that the typical Canadian drives about 55 kilometres per day, which tells you Level 1 sits right at the edge of what most people need.
Level 1 earns its place in a few situations:
- You drive a plug-in hybrid with a small battery that refills fully overnight.
- Your daily distance is short and your car sits parked for long periods.
- You want a portable backup for visits, cottages or a garage without a 240 V circuit.
- You are renting and cannot modify the electrical system.
Pro Tip: Schedule charging in your car’s app or infotainment screen so the session starts at bedtime and finishes by morning. If your outlet is on a shared circuit, ask an electrician about a dedicated 120 V line so a toaster or space heater never competes with your car.
How does Level 2 charging work at home?
A home Level 2 setup is a 240 V branch circuit, typically protected by a 40 A or 50 A breaker and feeding either a hardwired charger or a NEMA 14-50 outlet. That is the same class of circuit your clothes dryer uses, which is why it feels so familiar to an electrician.
The breaker size sets the ceiling on power:
- 40 A circuit: about 9.6 kW, often the sweet spot for cost and performance.
- 50 A circuit: about 11.5 kW, useful if your car can accept it.
Plug-in and hardwired installs each have a place. A NEMA 14-50 outlet lets you unplug the charger and take it with you if you move, and it works well for 40 A units. Once you reach 48 A or more, units are generally hardwired, which removes the receptacle as a weak link.
Here is the part many buyers miss: start with the car. Practitioner guidance from HomeChargerCalc explains that the onboard AC charger is the hard limit, commonly between 6.6 kW and 11.5 kW. A bigger wall unit only helps if your vehicle can accept the extra power. Their view is that a 40 A circuit is often the most cost-effective home install, and that 48 A installs saturate most onboard chargers.
Installers also stress a safety step during setup. Electricians at Portman Electric advise setting the charger’s internal current limit to 80% of the breaker rating, so a 50 A breaker runs the unit at 40 A. This reflects how continuous loads are treated under electrical guidelines.
Pro Tip: Look up your car’s maximum AC charging rate in the spec sheet before you buy a charger. If it says 7.2 kW, a 40 A circuit already gives you everything the car can take.
How much range does each level actually add?
The math is friendlier than it looks. At 240 V, power in kilowatts equals volts times amps divided by 1,000. A 40 A circuit gives 240 × 40 ÷ 1,000, or 9.6 kW. A 48 A circuit gives 11.5 kW. To estimate range per hour, divide that power by your vehicle’s efficiency in kWh per 100 km, then multiply by 100.
The table below is illustrative, not a set of measured results. Charging speed and time to full depend on your vehicle’s battery, efficiency and charger output.
The Level 1 row follows from the government’s 8 km figure and our assumed efficiency. The Level 2 rows come straight from the formula. Real charging slows near full, so treat full-battery times as slightly optimistic.
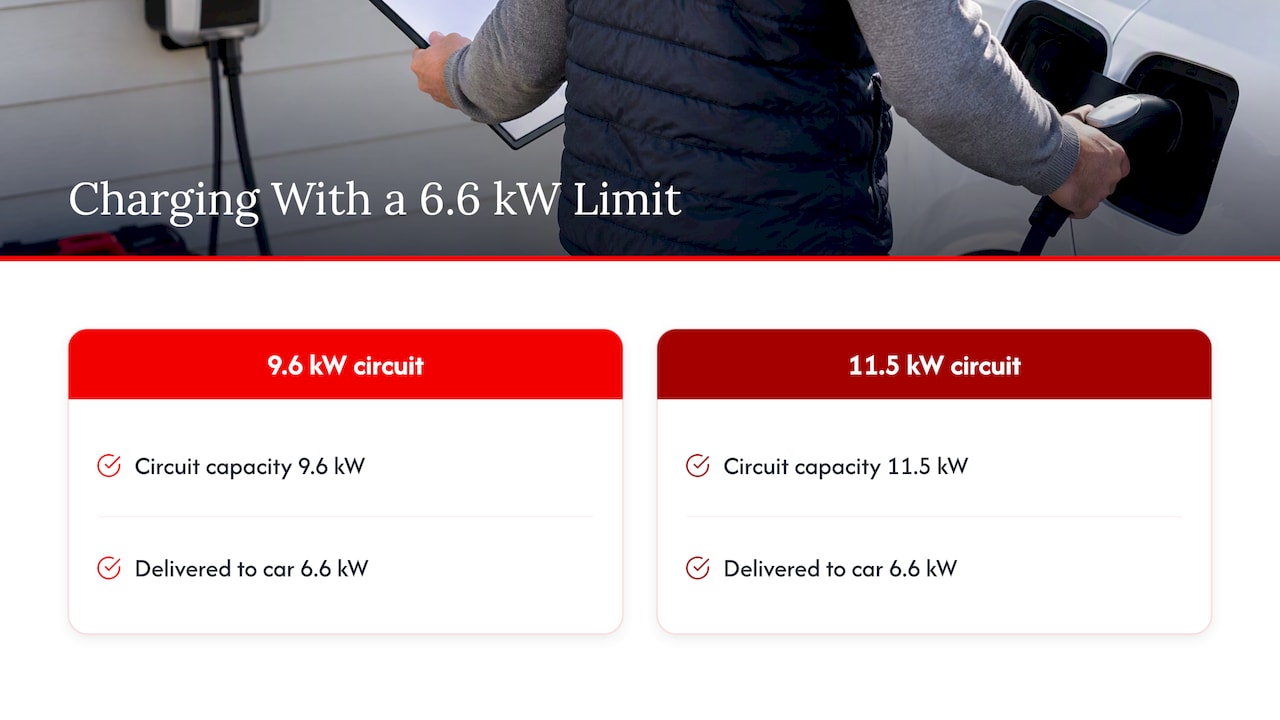
Now the catch. Suppose your car’s onboard charger tops out at 6.6 kW. It will charge at 6.6 kW on a 9.6 kW circuit and still at 6.6 kW on an 11.5 kW circuit. The extra capacity does nothing for charging speed, though it might help if you add a second EV later.
For a no-math shortcut, remember two numbers: roughly 8 km per hour on Level 1, and roughly 30 to 50 km per hour on Level 2 per the government range. Multiply by the hours your car sits parked, and you know whether a night is enough.
What does installing a Level 2 charger involve?
Installation is more routine than most people expect. Most jobs take 2 to 6 hours of labor once the permit is in hand, according to installer guidance. Here is the typical path:
- Check your panel’s capacity. An electrician performs a load calculation to see what your service can support alongside everything else in your home.
- Collect quotes. Ask at least two licensed electricians for written estimates that spell out the breaker size, wire run and charger type.
- Pull the permit. Your electrician usually files this, and it sets up the final inspection.
- Run the wiring. The installer runs cable from the panel to the garage or driveway, then adds a breaker.
- Install the unit. This means a hardwired charger or a receptacle for a plug-in unit.
- Commission and inspect. The installer tests the circuit, sets the charger’s current limit and arranges inspection.
Pay close attention to step one. Some installers quote a full panel upgrade almost by reflex, yet a proper load calculation can often avoid an unnecessary service upgrade. Ask to see the numbers behind any upgrade recommendation.
On breaker sizing, 40 A and 50 A circuits are the common residential choices, with 60 A used for higher-output hardwired units. A bigger circuit costs more in copper and labor, so match it to what your car can use.
If you go plug-in, skip the cheap hardware-store receptacle. Documented failures under continuous EV loads are why electricians recommend industrial-grade receptacles from makers such as Bryant or Hubbell. An EV pulls near-maximum current for hours, which is far harder on an outlet than a toaster.
Do not skip the permit. Master electricians at Plug’n Drive emphasize that a permit and final inspection protect safety, keep your home insurance valid and prevent headaches when you sell the house. An unpermitted circuit that overheats is not a risk worth taking to save a modest fee.
Pro Tip: When you compare quotes, ask each electrician to list the breaker size and the charger’s current setting. Matching quotes line by line makes surprise add-ons easy to spot.
What does home charging really cost, and what rebates exist?
Costs come in two pieces: the one-time install and the ongoing electricity. On installation, Natural Resources Canada reports that costs can range from $200 for simple circuit upgrades to over $1,500 for complex setups involving long wire runs or sub-panels. Here is what shapes your number:
- Panel capacity: spare room in your panel keeps things simple, while a sub-panel adds cost.
- Distance: a garage next to the panel is cheap, and a long run to a detached building is not.
- Hardware: a plug-in charger on a NEMA 14-50 outlet costs less in labor than a hardwired high-amp unit.
- Permit and inspection fees: these vary by municipality, so ask your electrician for the local figure.
- Equipment: chargers vary widely in price, so get the model and cost itemized on your quote.
Natural Resources Canada says some provinces offer rebates covering up to 50% of the installation cost, so check your provincial energy provider before you book any work.
That rule of thumb is worth repeating: check incentives first, because some programs require approval before the work begins.
Running costs are friendlier still. Natural Resources Canada states that most EV charging happens at home and shows up on your electricity bill, and that electricity is generally cheaper than gasoline. Public stations bill in several ways: by time, a flat fee, per kilowatt-hour or a mix, so compare before you plug in.
For broader context on why the economics add up, see our guide on why electric vehicles are worth it. To keep your bills down once the charger is running, our energy saving tips help.
How do you choose between Level 1 and Level 2 in three questions?
You can settle this with three honest answers.
- How far do you drive each day? If it is under roughly 40 to 50 km and your car is parked for long periods, Level 1 may be enough. Anything beyond that points to Level 2.
- What is your car’s onboard AC charging limit? Find the kW or amp figure in the spec sheet. That number caps your speed, no matter what the wall unit can supply. Remember the rule: start with the car.
- What can your panel support, and what rebates exist? Ask an electrician for a load calculation and check provincial and utility programs. A solid panel and a 50% rebate make Level 2 an easy yes.
Then act. Run the range math from earlier with your own numbers, collect electrician quotes, confirm the permit and apply for any rebate before work starts. If you are still shopping for a car, do this before delivery day so the charger is ready when the vehicle arrives.
Pro Tip: If you are unsure, try Level 1 and track your battery percentage regularly. If you keep waking up under what you need, you have your answer, and the data will make your electrician’s job easier.
What should you expect day to day with each option?
Living with a charger is mostly about convenience, upkeep and how the setup fits your home over time.
- Level 1 convenience: It travels with you and needs no installation, which makes it a fine backup. The price is patience, so plan for slow top-ups.
- Level 2 convenience: A full recharge is usually done by morning, and most owners stop thinking about charging altogether. Hardwired units stay put, which is part of why they feel so reliable.
- Maintenance: Watch for worn plug contacts and warm outlets, especially on plug-in setups. Good receptacles and a proper commissioning check after install prevent most problems.
- Resale: A professionally installed Level 2 charger reads as a practical upgrade to many buyers, because it saves them the same project. Keep the permit paperwork handy to show the work was done right.
Neither choice is permanent. Plenty of owners begin with Level 1 and move up once they see how the car fits their routine.
Our final take: start with the car, then check the panel
Our team at Lizard’s Lunch keeps the advice simple: for most daily drivers, Level 2 is the right call, and the smartest first step is learning your car’s onboard charging limit. Then verify what your panel can handle with a proper load calculation, and get more than one quote before agreeing to a panel upgrade. Installers sometimes reach for the biggest, priciest fix when a smaller one would do.
We approach consumer guidance as editors. We read the primary sources, compare them against practitioner experience and tell you where the evidence is strong. Plan early, ask questions and let the numbers lead.
FAQ
Is it better to charge at Level 1 or Level 2?
For most drivers, Level 2 is better because it can refill a typical battery overnight. Level 1 is best for plug-in hybrids or very low daily mileage, under about 40 to 50 km.
Do I really need a Level 2 charger at home?
Not always. If you drive short distances and your car sits parked for many hours, Level 1 can cover your needs. If you drive more or want a full battery each morning, Level 2 removes the guesswork.
Why is Level 1 charging not always recommended?
It is slow, adding about 8 km of range per hour according to government guidance. That is fine for light use, but it struggles to keep up with longer daily drives.
Is a Tesla charger Level 1 or Level 2?
The cordset that ships with a car is typically Level 1 on a 120 V outlet, while a wall-mounted home unit is Level 2 on 240 V. Check the label on your specific equipment, since both types exist for most brands.
How fast can my car actually charge on Level 2?
It depends on the car’s onboard AC charger, which commonly sits between 6.6 kW and 11.5 kW. A larger circuit cannot push past that limit.


















Leave a Comment
Your email address will not be published. Required fields are marked with *